
So, in the sport of trying to keep the tradition going with this pregnancy, to keep my 'nesting list' as random as possible, naturally, I decided to add, "-to refinish a piano", to it, this past fall. Haha! Some random things that were included on my second born's list, were, "-to learn how to puree and preserve fresh pumpkin" and "-can 2 bushels of apples into apple sauce" (can you take a guess what month he was born in ;-) ). All of these crazy ideas, along with the normal, "-redecorate the nursery"; "-pack my birth bag"; "-wash all newborn to 3 month clothes and put them in dresser". Basically, what I'm saying, is that I'm a mad woman and drive myself crazy (and probably along with my husband, at times as well. Lol!) I'm slightly embarrassed to admit that my birth bag just barely got packed, and I'm now less than 4 weeks away from meeting this little man of ours. The piano was done before Christmas. Haha! #PrioritiesPeople.
BUT let's get real for a minute...I need to be a little more fair to myself. We had some awesome friends of ours, move across the country, before Thanksgiving, and before they did, they graciously gave us their old piano, since they didn't want to move it all the way to Montana. I was so SO grateful! I've been on the look out for an older piano, to make a part of our home, in hopes of picking up where I left off years ago, and be able to get the boys in piano lessons as well, in coming years. I knew it was going to eventually happen someday, and was even saving chalk paint /stain combo ideas in my Pinterest account, for when I found the perfect one. So, once our lovely friends gifted it to us, I already had a vision for it, in our dining room. AND since, I was only going to get bigger and less equipped to bend over/sit on the floor as this baby grew, I knew I needed to hurry and get it done! I gave myself a goal to get it all finished up before Christmas. And I did it! We've been blessed with incredible warm weather this winter, so I was able to work on it a lot, in the garage/in the driveway, during the toddler's nap time. My oldest little man, loves to help me with stuff like this, so it really was a fun project to accomplish, and gave us some one-on-one time. Once it was all ready to be painted, my amazing husband and some of his man pals, graciously moved it into our dining room for me. That's where I finished up painting and staining it, since it started to get a little too cold outside for that, at that point. So, thank you handsome husband, and friends (some which helped move the piano twice! First from our friend's house to ours, then to the garage to the dining room!...I have the best husband and we have some of the best pals around, to put up with all my crazy DIY shenanagans!) Haha!
SO, without further ado, here are some tips that I was able to capture of the process:

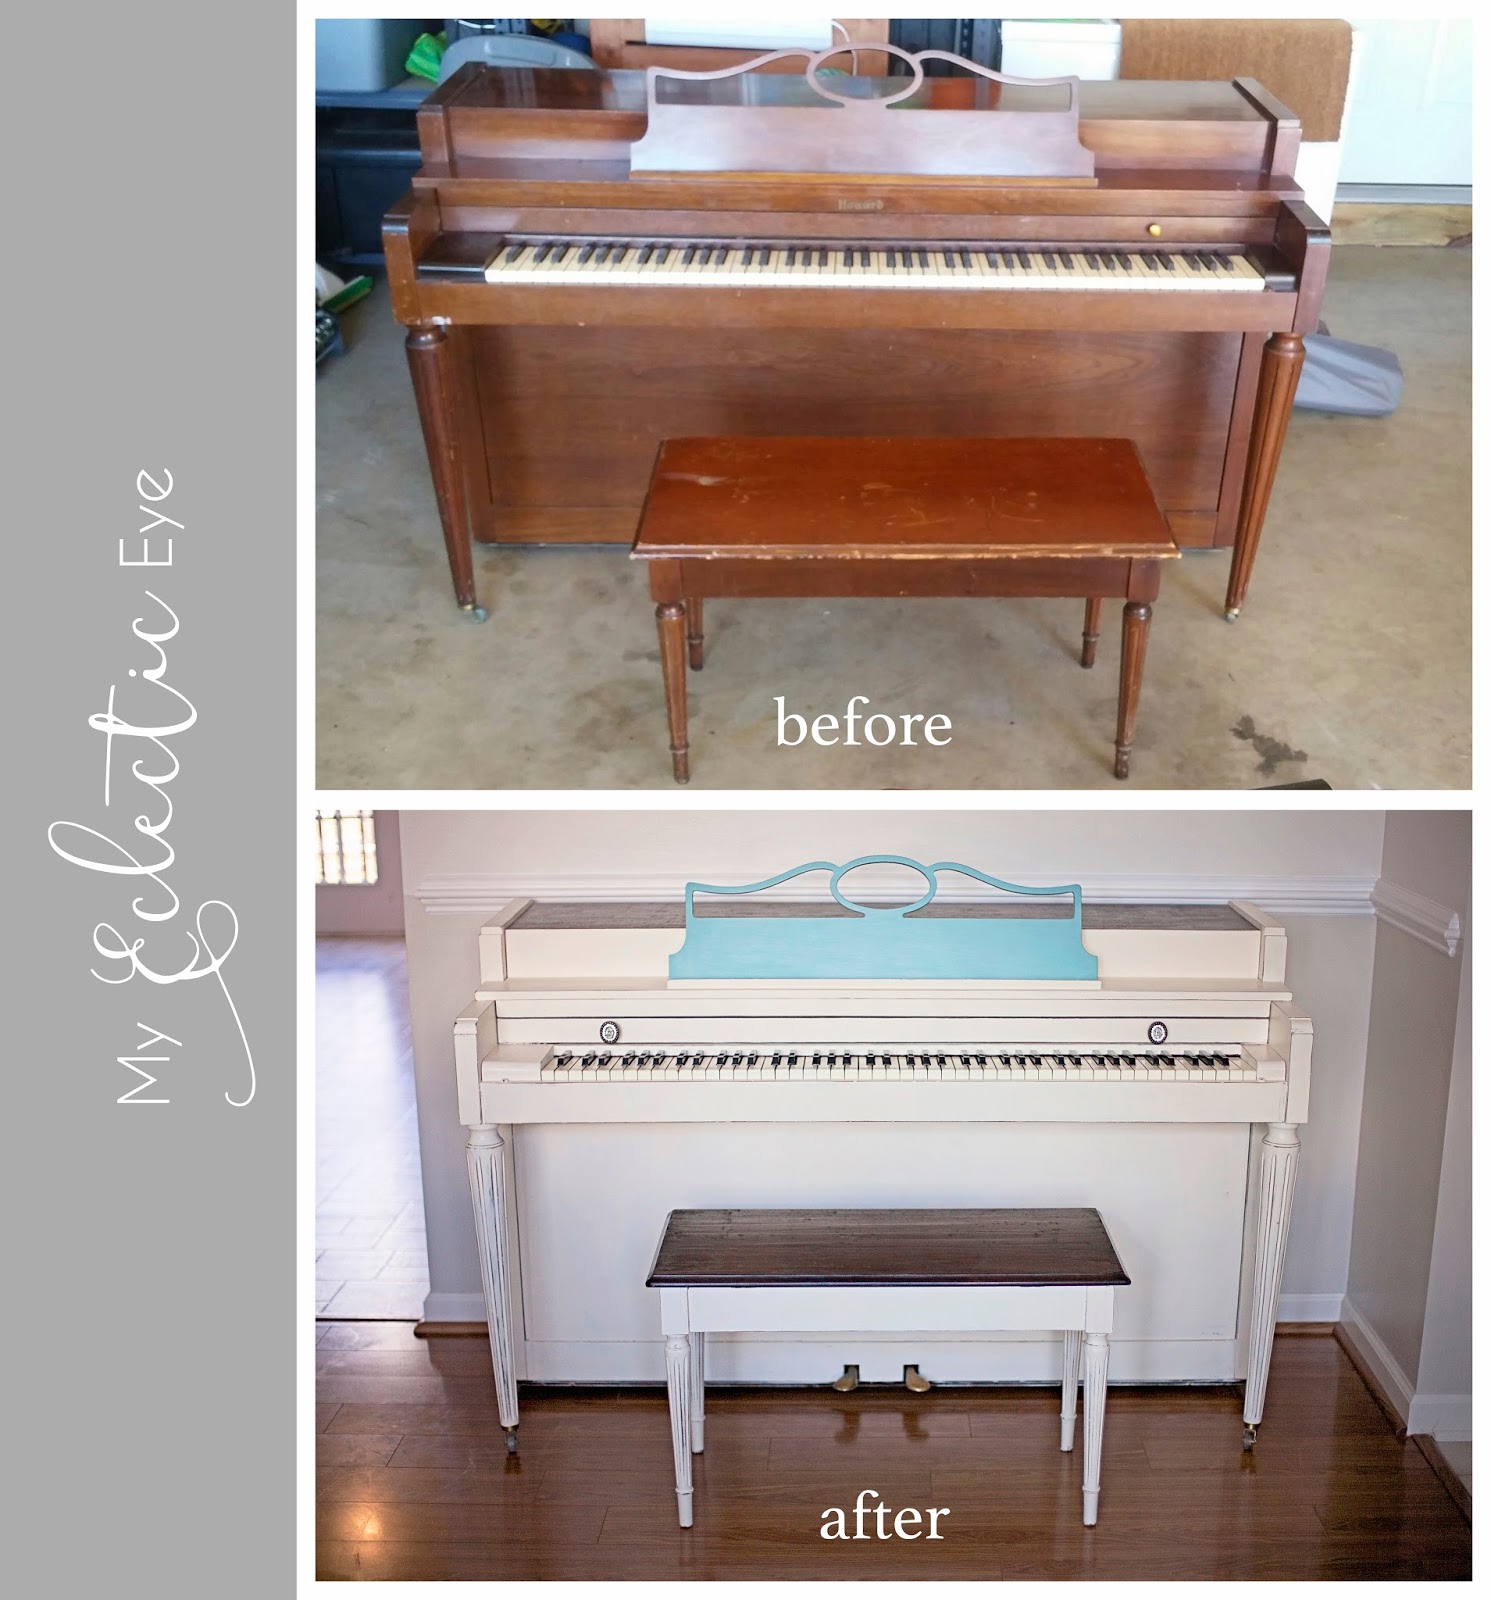
I wanted the piano to somewhat match our dining room table and chairs. So I knew I wanted to stain the top, the same color we used on our table top, and chairs. So, that required me to take off the top of the piano and sand it down, so I wouldn't have to use as much gel stain.


Then there was the stool. I wanted just the top of it stained, to match our dining room chairs. To get an idea of our dining room set, you can see part of it, in the first pictures of my DIY Mirror Makeover!
Here is where I need to give another HUGE shout out to my husband! For some reason, the original varnish on the stool seemed to be indestructible! So, we used the highest grit of sandpaper we could find, and my husband sanded away the top, with our belt sander (one of the best investments we've ever made, FYI!), while I hand sanded the beveled edge, along the sides. I'm not 100% on the actual model number we have, but it's similar to the one found here: Ridgid Belt Sander. We seriously use it for almost every wood project. And it's so easy to use, I'm not afraid to whip it out on my own, when I'm working on my own DIY projects.

Once everything was all sanded, blown off and the piano was brought inside, the first step was to tape off all the keys. This was probably my least favorite step. It was pretty tedious, but I wanted to do my best job, to make sure as much of them were covered, as possible.


Then it was Gel Stainin' time! I love, love LOVE this stuff! I'm a huge fan of General Finishes, but especially their Gel Stain. It doesn't require sanding to use, which is nice. If possible, I sand down the surfaces, if our trusty belt sander can be used, since it takes almost a quarter of the amount of stain, to achieve your desired color and tone, when used on raw wood, but we've used it over top of other stains, just fine as well. Of course, I used my go-to GF Gel Stain shade of Java! So classic.
Like previously mentioned, I proceeded to stain just the very top of the piano, and then just the top of the bench. Knowing I would want to use at least 2 coats for those pieces, and knowing it also takes more time to dry and cure than the Chalk Paint, I decided to start on those first. Once they were dried with the color I wanted, I ended up using a couple coats of General Finishes Gel Top Coat, in Satin, over the dried stain. I made sure to use at least 3 coats, like suggested in the directions, since the bench seat and top, will have things on them, like heinies and decor ;-)


Then I started on body of the piano and bench. I used Annie Sloan's Chalk Paint, in Old White. I only had to do two coats, since I knew I was going to distress it a bit, to match our antiqued table. I lightly sanded between the 2 coats, once the first coat was nice and dry. After the second coat, I distressed the entire painted pieces, using a mid-grit sand paper, and buffed Annie Sloan's Clear Chalk Paint Wax into all the chalk painted areas.
Lastly, was painting the music stand with Annie Sloan's Provence Chalk Paint. I wanted to add a little pop of color, all while trying to tie in another piece of our dining room, our large mirror, that I refinished this past summer. You can find the tutorial for that, here. I, of course distressed that, after only one coat, and then buffed Annie Sloan's White Chalk Paint Wax, to lighten the color up just a tad.

My last finishing touch, after cleaning up my mess, was to pick out new knobs. I wanted something that would be small enough, but that would also tie in some of the other elements to the piano. With it being mostly white, I was OK looking for some with a little bling as well ;-)
I ended up falling in love with these ones from Hobby Lobby: Antique Bronze Oval Knob. They happened to be 50% off when I bought them a couple months ago, and they look to be 50% off again! Such a great deal! (Have I ever mentioned how much I love Hobby Lobby?!...I'm mean but lets be honest, who doesn't?)

And there you have it! I love everything about this, and had so much fun with it, and am still having fun with it...my boys have been enjoying playing on it everyday, since.
#GoalAccomplished!

No comments:
Post a Comment